
How to add a cover, page numbers and print a book
User guide contents ↓Once the pages are in order (How to make a booklet from a PDF), three jobs are left before printing: the cover, page numbers and margins, then imposition, export and double-sided printing. This guide takes them in that order.
Part of booklet and catalog imposition.
Book cover
Covers are usually printed on heavier paper than the body (the inside pages), so Trimto imposes the cover as a separate file. Printers number the four cover sides: Cover 1 is the front, Cover 2 the inside of the front, Cover 3 the inside of the back, Cover 4 the back (full table below).
Default order and Page no.
When you open a file, Trimto uses Default order (in the Book cover section of the right column, ticked by default): pages run in order, pages 1 and 2 go to Cover 1 and Cover 2, the last two pages go to Cover 3 and Cover 4, and the rest are the inside pages.
A saddle-stitched booklet prints on folded sheets (one sheet folded in half, 4 pages), so the inside is always a multiple of 4. Pages run Cover 1, Cover 2, inside pages, then Cover 3, Cover 4; the last pages only go to Cover 3 and Cover 4 when they do not fit the inside. A 16-page booklet: covers 1, 2, 15, 16, inside 3–14. A 15-page booklet: inside is still 3–14, Cover 3 is page 15 and Cover 4 stays blank.
When some sides will not be printed (an empty cover slot or blank pages added at the end of the inside), Trimto shows how many and how to reduce them. For example, 15 pages with an outside-only cover: inside 2–15 plus 2 blank pages, 5 unprinted sides in total (Cover 2, Cover 3, Cover 4 and 2 at the end of the inside). The Folded sheet map section in the right column lists every side: Outside cover, Inside cover, Sheet 1 side 1, Sheet 1 side 2…
Each slot (Cover 1, Cover 2, Cover 3, Cover 4) has a Page no. box underneath showing which page is in it. Type another number (the page's position in your file; a second file continues counting after the first) and press Enter: that page moves to the slot, the old one goes back to the inside pages, and the inside pages reorder automatically. Clear the number to leave the slot empty and send its page back. For an outside-only cover, clear Cover 2 and Cover 3.
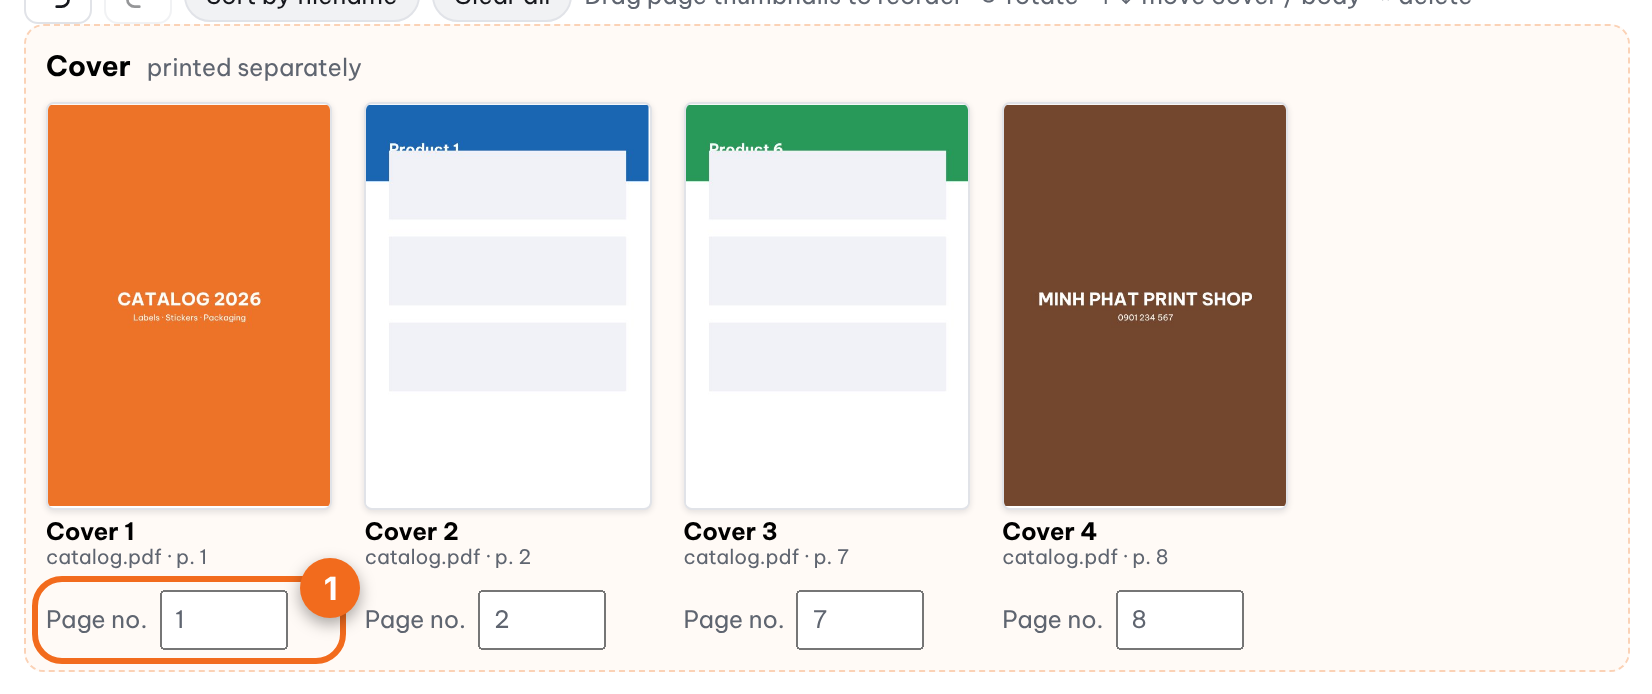
Dragging works too: drag page 5 onto Cover 1 and its Page no. box shows 5. Entering the number of a page that is already in another cover slot swaps the two slots. Any change from the default unticks Default order; ticking it again restores the default. Unticking it moves every page back to the inside pages, so the cover prints with them. Click ↑ on an inside page to move it to a free cover slot, or ↓ on a cover page to send it back.
Drop a new file onto the Cover area to use it as the cover; files named with cover (for example cover.pdf; the Vietnamese word bia also works) go to the cover automatically. When Cover 2 or Cover 3 has a page, the cover sheet prints on both sides; an empty slot prints blank.
Add cover margins (in the Book cover section): turn on when the cover file has no margins, then set inside, outside, top and bottom margins for the cover only (separate from Inside page margins), and choose Shrink content, keep size or Keep content, enlarge book as for the inside pages. The inside and the cover always share one book size: if both enlarge the book, the larger margins win.
Cover 1 to cover 4
| Name | Position | Printed when |
|---|---|---|
| Cover 1 | Front cover, outside | When the slot has a page |
| Cover 2 | Inside of the front cover | When the slot has a page |
| Cover 3 | Inside of the back cover | When the slot has a page |
| Cover 4 | Back cover, outside | When the slot has a page |
The first and last pages of a file are usually cover 1 and cover 4. If your book has designed inside covers (cover 2, cover 3), put them in the two middle slots; otherwise leaving them blank is normal.
When to print the cover separately
Covers wear more and usually use heavier stock (200–300 gsm), lamination or foil, while the inside uses lighter paper (80–120 gsm). The two stocks cannot run through one print job, so Trimto exports two files: inside and cover. A thin booklet can also use a self-cover, printed on the same paper as the inside: untick Default order, and the cover pages are imposed with the rest.
Cover sheet size
During the imposition step, select the cover size under Cover sheet size; click Cover above the center preview pane to view the cover sheet. For perfect binding, the flat cover spread includes cover 4, the spine, and cover 1—see How to make a booklet from a PDF.
Page numbering
Open Page numbers in the right column, turn on Number inside pages, then choose:
| Option | Meaning |
|---|---|
| Start counting from: Cover 1 | Cover 1 is page 01 (number not printed), body starts from page 02 (from 03 when the Cover 2 or Cover 3 slot has a page, because cover 2 is then page 02) |
| Start counting from: First inside page | The first body page is page 01 |
| Font | The typeface for page numbers (previewed in the font itself; you can add your own .ttf/.otf); the B button makes it bold |
| Size, From edge | Page number size (pt) and distance to the trimmed sheet edge (mm) |
| Position | Footer or header, outer corner or center |
| Prefix | For example, "Page" → "Page 01". Leave blank to print the number only |
Page numbers always have 2 digits (01, 02…). The Prints: line shows how the page numbers will look.
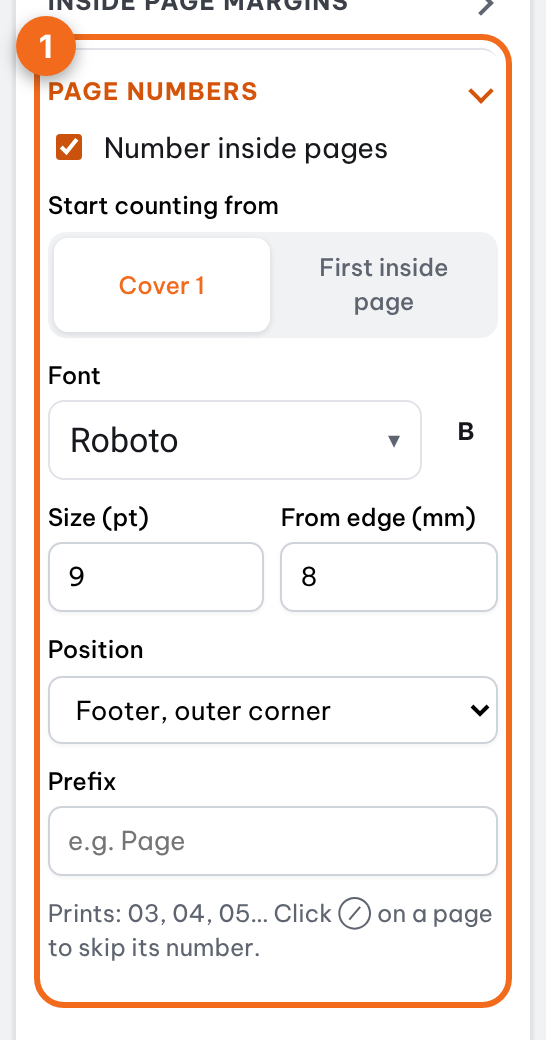
The page thumbnails in the center show the numbers in the same font, size and position as the print file. Numbers are not printed on covers, blank pages, and pages marked ⊘ keep as-is. Click ⊘ on a page thumbnail for full-bleed image pages, table of contents, etc.
Choosing how pages are counted
- Start from Cover 1: best when printed contents pages must match the true file order (cover 1 is page 01, so the first content page gets 02).
- Start from the first inside page: best when the cover is separate and the interior must start at page 1 (course books, proceedings with a hand-made contents page).
If your design already prints page numbers in a table of contents, pick the counting method that matches it, then check the first and last pages in the preview before exporting.
Position and size
Numbers at the outer corner (left on even pages, right on odd pages) are easy to find when flipping through; centered footer numbers are tidier for documents. 8–10 pt is readable without crowding the content. Keep From edge at 5–6 mm or more so a slightly off cut doesn't clip the number.
Inside page margins
Use this when the design file lacks margins (e.g., photo scans of documents, Word files exported to PDF with content edge-to-edge). Open Inside page margins, turn on Add margins (file has none), then enter:
- Inside (spine) margin (also called the gutter): the side along the binding, usually the widest because the binding hides part of it.
- Outside, Top, Bottom.
Choose one of two ways:
- Shrink content, keep size: each page's content scales down to fit inside the margins; the book size stays the same.
- Keep content, enlarge book: content keeps its size and the book grows by the margins (for example an A5 page of 148 × 210 mm with a 15 mm gutter and 10 mm on the other sides becomes 173 × 230 mm). The cover follows the new size.
The line under the margin fields shows the final book size. The gutter margin automatically mirrors between left and right pages. The purple dashed outline on the page thumbnail marks the content area after margins are added.
Tip: If the file already has margins set up, turn off Inside page margins to avoid doubling the margins.
Inside page margins: starting values
| Finished size | Gutter | Outside | Top / bottom |
|---|---|---|---|
| A5 (148 × 210 mm) | 15–20 mm | 10–15 mm | 12–15 mm |
| A4 (210 × 297 mm) | 20–25 mm | 15–20 mm | 15–20 mm |
Rules of thumb only. Perfect binding needs a wider gutter than saddle stitch because milling eats into the paper (see How to make a booklet from a PDF).
Placing pieces on one sheet
Click Continue on the page arrangement step to move to imposition.
Trimto always optimises for the one press sheet size you pick; there is no quantity to enter. The priorities are: keep the full bleed first, then fit as many pieces as possible on the sheet. Print the sheet as many times as you need copies.
The inside pages are laid out for one copy: the different sheets go onto the press sheet in order 1, 2, 3… For a saddle-stitched booklet each cell is a folded sheet, so two A4 folded sheets on SRA3 give press sheet 1 = folded sheets 1 and 2, press sheet 2 = folded sheet 3 and an empty cell. Covers and folded brochures are repeated to fill the sheet. The number of sheets and sides appears at the top of the preview.
Sheet size
Select from Body sheet size (and Cover sheet size when configuring the cover): ISO sizes (A4, SRA4, A3, SRA3), US sizes (Letter, Legal, Tabloid, 12 × 18 in, 13 × 19 in) or a custom size (with shortcuts for popular A3+ digital press sizes). Turn on Auto orientation to let Trimto pick portrait or landscape for the highest page yield per sheet.
The Cut settings section uses the same straight cutting as Quick Layout: choose Single cut (neighbouring pieces share one cut) or Double cut (each piece is cut on its own, with a gap of twice the bleed), set Bleed per side (2–3 mm for pages with full-bleed backgrounds; a negative value moves the cut into the page) and add Crop marks and fold marks in sheet margins for trimming and folding. A perfect-bound cover is one piece, with no marks at the spine.
The Safe margin section (Top, Bottom, Left, Right; 3 mm by default) keeps the whole layout, bleed included, away from the paper edge, since printers can't print to the edge. For double-sided printing the left and right margins (or top and bottom when flipping on the short edge) use the larger value, so the back lines up with the front. Trimto always keeps the full Bleed per side: when the sheet is too small it places fewer pieces and tells you how many were dropped; only when not even one piece fits does it reduce the bleed. Rotate 90° to fit more pieces (on by default; untick it if you don't want it) lets Trimto turn some pieces sideways to fill the empty space, as straight cutting does in Quick Layout; a piece rotated on the front is rotated the other way on the back so both sides match.
For a Folded brochure, each file is one brochure. Upload several files with the same fold and size and Trimto gangs them on one sheet, filling the sheet, then you cut with a single or double cut as above.
Pre-export checklist
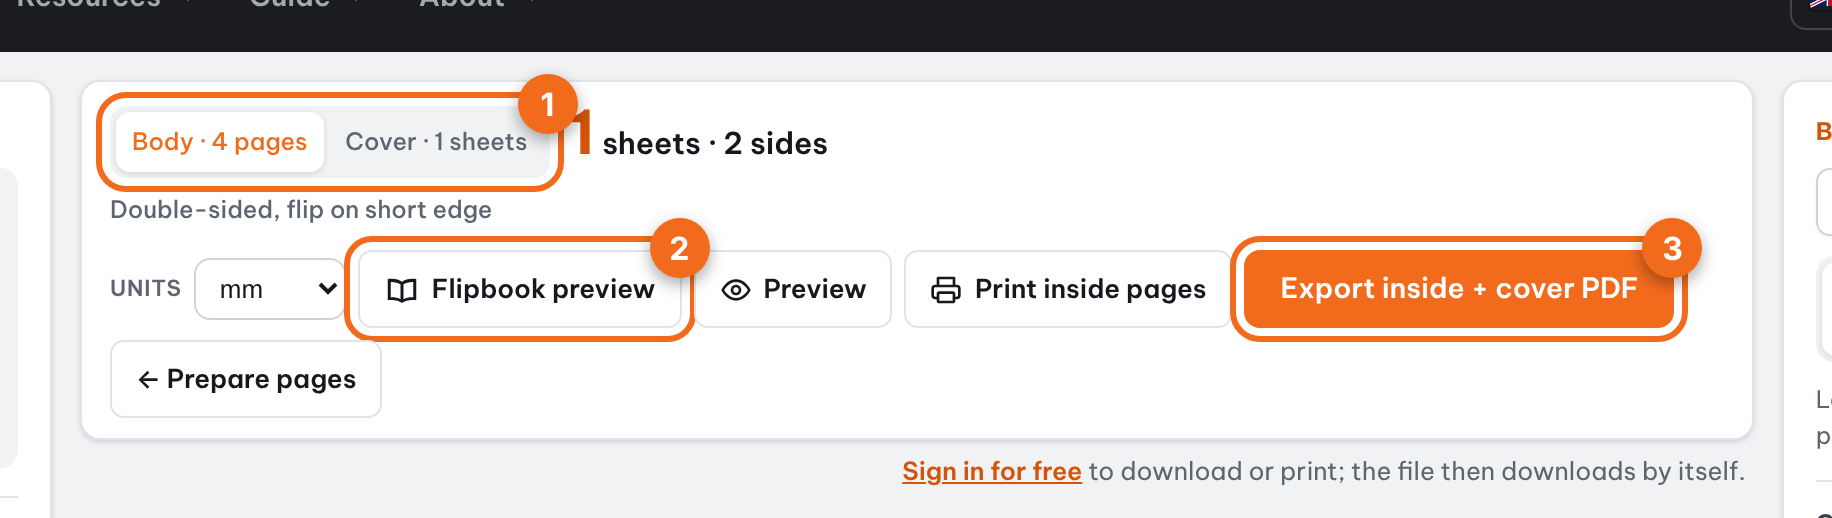
- Inside / Cover above the center frame: toggle between inside sheets and cover sheets.
- Each sheet displays the front side and back side exactly as it will print. Click ‹ › to view each sheet.
- Book preview: flip through spreads of the finished book, including the cover, to verify page sequence.
- Preview: open the PDF in full-screen mode before exporting. Click Print inside (or Print cover) to print directly from the browser.
Export PDF
Click Export inside + cover PDF (sign in required). Trimto generates two separate files: one for the inside pages and one for the cover, since covers typically use a different paper stock (thicker, sometimes laminated). Folded brochures have no separate cover, so they export as one file with Export print PDF.
Within each file, the front and back of each sheet are placed consecutively (page 1 is sheet 1 front, page 2 is sheet 1 back, etc.).
Double-sided printing
Enable double-sided printing on your printer driver and match the flip edge indicated by Trimto below the back sheet: flip on long edge or flip on short edge. Set the scale to 100%, never "fit to page", which shifts sizes and crop marks.
Choosing the wrong flip edge is the most common mistake: the back side comes out upside down relative to the front, and the finished book has inverted pages. Trimto prints the correct flip edge for every sheet so you can follow it instead of guessing.
Tip: Print a single test copy first, then fold or collate following the steps in Post-print steps, and check the page numbers before printing the full quantity.
Common mistakes
- Wrongly split cover: change the number in the Page no. box, or click ↓ on a cover page to return it to the body. Tick Default order again to go back to the default.
- Forgotten cover size: the cover prints on a different size from the inside but Cover sheet size was not changed. Check before exporting.
- Perfect-bound spine mismatch: the flat cover is cover 4, spine, cover 1; spine thickness depends on page count and paper, see How to make a booklet from a PDF.
- Numbers printed on covers: choose the right counting method and let Trimto skip covers and blank pages. For full-bleed image pages or contents pages, click ⊘ keep as-is.
- Margins applied twice: the file already has margins but Add book margins is still on, so content shrinks more than expected.
- Number overlapping content: increase From edge or move the number to another corner.
- Gutter too narrow: text near the spine disappears when the book is closed; test with a real book and widen it.
FAQ
Are blank pages that Trimto adds at the end counted? They count toward the order but never get a number printed.
Can I use roman numerals for the front matter? Trimto prints ordinary two-digit numbers (01, 02…). Number those pages in your design file and click ⊘ keep as-is on them.
Further reading
- Wikipedia, Book cover and Bookbinding.
- Trimto Learn: Saddle stitch vs perfect binding vs spiral binding.
- Wikipedia, Pagination and Margin (typography): page numbers and inside / outside margins.
- Trimto Learn: What is imposition.
- Wikipedia, Duplex printing: long-edge and short-edge flipping.
- Adobe Acrobat Help, Print at actual size.
- Trimto tools: Book spine width calculator.