
What is imposition in printing? A plain guide
Imposition is the prepress step that arranges pages or copies of a design on a larger press sheet, in the right positions and orientation, so that after printing, folding and cutting everything comes out in the right order and the right size, with as little paper waste as possible. It sits between design and printing: the designer delivers single pages, imposition turns them into printable sheets.
In Trimto, imposition runs in your browser: step and repeat and die-cut nesting for labels and cards, booklet imposition for booklets and catalogs.
There are two everyday kinds.
1. Step and repeat (labels, cards, flyers)
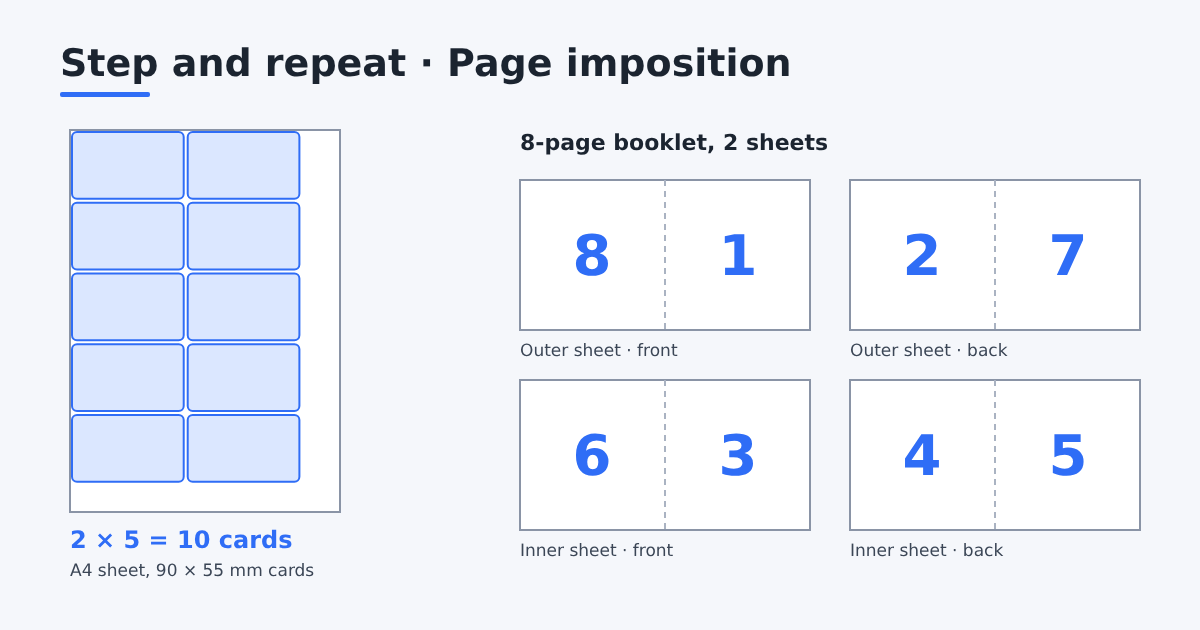
You have one design, for example a business card, and you want many copies on one sheet. The software repeats the card in a grid, adds the gaps for cutting, and places crop marks.
Worked example. A business card is 90 × 55 mm. On an A4 sheet (210 × 297 mm) with no gaps and no bleed:
- across: 210 ÷ 90 = 2 cards (180 mm used)
- down: 297 ÷ 55 = 5 cards (275 mm used)
- total: 2 × 5 = 10 cards per sheet
Add 3 mm bleed on every side and each card occupies 96 × 61 mm. Across it is still 2 (192 mm), but down only 4 (244 mm; a fifth would need 305 mm). Laid out this way the sheet now holds 8 cards; turning every card 90° (61 × 96 mm) fits 3 across and 3 down, so 9 cards. This is why bleed and orientation change your quantities, and why a calculator saves paper: try the items per sheet calculator.
For stickers with irregular shapes, die-cut nesting packs the shapes tightly instead of using a fixed grid.
2. Page imposition (booklets, books, catalogs)
Here the pages of one document are placed on sheets so that, once printed on both sides and folded, they read in order. The order is not intuitive. An 8-page saddle-stitched booklet uses two sheets, each printed on both sides:
| Sheet | Side | Left page | Right page |
|---|---|---|---|
| Outer | Front | 8 | 1 |
| Outer | Back | 2 | 7 |
| Inner | Front | 6 | 3 |
| Inner | Back | 4 | 5 |
Fold the stack once and the pages run 1 to 8. The total must be a multiple of 4 for saddle stitching, so a 6-page document gets two blank pages. The booklet page order calculator lists the order for any page count, and booklet imposition does the layout for you.
Printing the back: sheetwise, work-and-turn, work-and-tumble
When a job is printed on both sides, the imposition also decides how the back meets the front. On an offset press there are three classic methods:
| Method | Plates | How the sheet goes back through | Result |
|---|---|---|---|
| Sheetwise | One set for the front, one for the back | Turned over, same gripper edge | One copy per sheet, usual for books |
| Work-and-turn | One set holds front and back side by side | Turned over left to right, same gripper edge | Two identical copies, cut apart after printing |
| Work-and-tumble | One set holds front and back, head to head | Flipped top to bottom, gripper edge changes | Two copies, used when the sheet is long |
On a desktop or digital printer the same choice shows up as "flip on long edge" or "flip on short edge". If the flip setting does not match the imposition, the back prints upside down or lands behind the wrong copy. Trimto's double-sided step and repeat places every back exactly behind its front for the flip you choose.
How to impose a job, step by step
- Start from the finished size. Note the trim size of one item and whether the file has bleed.
- Pick the sheet. Use the paper your printer actually loads, for example A4, SRA3 or 12 × 18 in, and subtract the margin the printer cannot reach (often 3 to 10 mm on digital machines).
- Choose the layout. A grid for rectangles, nesting for irregular stickers, a booklet order for pages.
- Add the marks. Crop marks for the guillotine, a cut contour for the plotter, and if needed a color bar and a job line in the margin.
- Check the count. Sheets × copies per sheet must reach your order quantity. Round up, never down.
- Proof one sheet. Print it on plain paper, cut or fold it by hand, and compare it with the design before the real run.
Common mistakes
- No bleed. Background colors that stop exactly at the trim line leave a white hairline when the cut drifts by half a millimetre.
- Wrong page count. A saddle-stitched booklet needs a multiple of 4 pages. Plan the blanks yourself instead of letting the software add them at the end.
- Ignoring creep. In thick booklets the inner pages stick out after folding. Read what creep is before printing more than about 32 pages.
- Gaps that do not match the cutting. A single cut between items needs a shared bleed; a double cut needs a real gap. Decide which one your finisher uses.
- Mixed orientation. Rotating some items to fit one more per sheet saves paper, but check that grain direction (the way the paper fibres run, which affects folding and stiffness) and numbering still work.
Why it matters
- Less paper waste. More copies per sheet means fewer sheets and fewer cuts.
- Correct order. Wrong imposition means pages end up upside down or out of sequence after folding.
- Predictable finishing. Crop marks, gaps and bleed tell the guillotine or die cutter where to cut.
Imposition is normally done in prepress software or by your printer. Trimto does it in the browser, free, and your files stay on your computer.
For a product-by-product walkthrough (labels, stickers, booklets, brochures, zines), see print layout: how to lay out labels, cards, pages.
Sources
- Wikipedia, Imposition: history, signatures and digital imposition.
- Wikipedia, Prepress: where imposition sits in the print workflow.
- Wikipedia, ISO 216: A-series paper sizes used in the examples.
- Adobe InDesign Help, Impose documents for booklet printing: how desktop publishing software imposes a booklet.