
Bleed, trim and safe area explained (mm and inches)
Bleed is the extra artwork that extends past the trim line, usually 3 mm (0.125 in) on each side, so that no white edge shows after cutting. The trim line is the finished size, and the safe area is the zone inside it where text and logos must stay. Getting these three right avoids thin white borders and cut-off text. In Trimto, step and repeat can also fill missing bleed for you (see below).
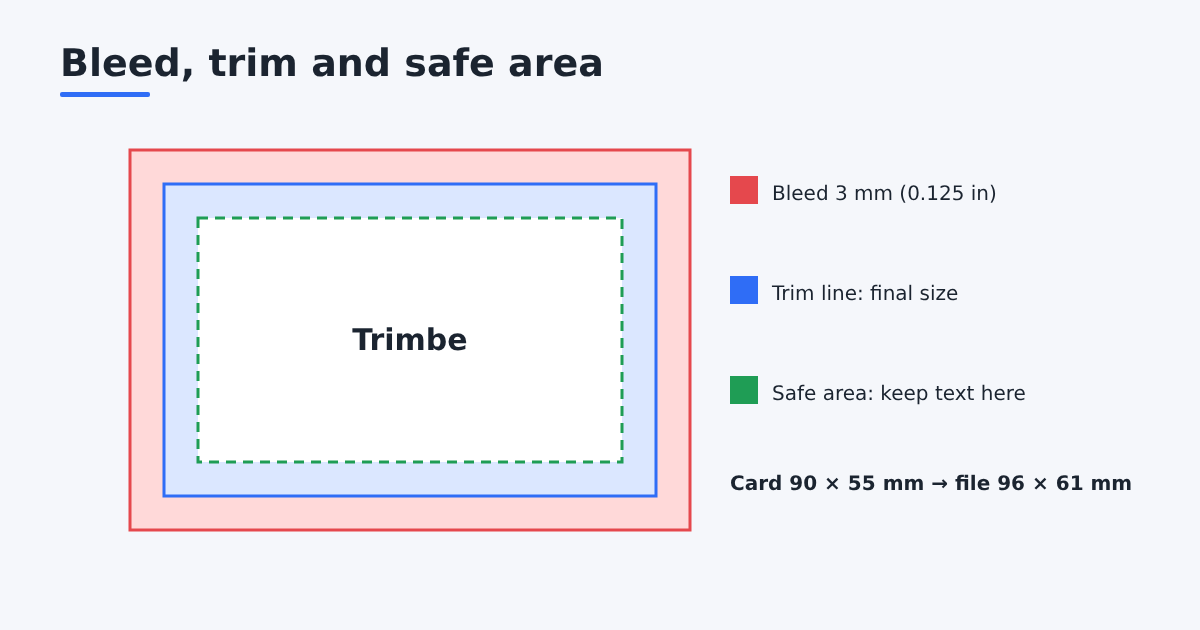
The three boxes
| Term | What it is | Typical size |
|---|---|---|
| Trim line | The final size after cutting. | e.g. 90 × 55 mm |
| Bleed | Artwork extended beyond the trim line, so the cut still lands on ink. | 3 mm (0.125 in) per side; some printers accept 2 mm |
| Safe area | The zone inside the trim where text and logos must stay. | 3 to 5 mm inside the trim |
Think of it as nested rectangles: bleed on the outside, trim in the middle, safe area on the inside.
Why bleed exists
Cutting is never perfect. A guillotine or die cutter can drift a fraction of a millimeter, and paper can shift slightly in the stack. Without bleed, a small drift leaves a white sliver along the edge. With bleed, the blade cuts through colour and the edge stays clean.
Worked example. A 90 × 55 mm card with 3 mm bleed is exported as 96 × 61 mm (90 + 3 + 3 by 55 + 3 + 3). Inches work the same way: a 3.5 × 2 in card with 0.125 in bleed is 3.75 × 2.25 in.
Why the safe area matters
The same drift can slice into text placed too close to the edge. Keep important text, logos and QR codes inside the safe area so a small shift never cuts them.
What if my file has no bleed?
You have three options:
- Go back to the design and extend backgrounds past the trim, then export again with bleed. This is the best result.
- Scale the artwork up slightly, which crops the edges. Only fine if nothing important is near the edge.
- Fill the missing bleed automatically. In Trimto's step and repeat you can choose a colour underlay (good for solid backgrounds) or a mirror underlay that reflects the edge outward (good for photos and patterns). See add bleed to a print file.
Bleed and safe area by product
Printers publish their own specs, so always check yours first. These are common starting points:
| Product | Bleed per side | Safe area inside trim | Note |
|---|---|---|---|
| Business cards | 3 mm (0.125 in) | 3 to 4 mm | Thin cards show drift easily, keep text well inside |
| Flyers and posters | 3 mm | 5 mm | Larger sheets drift more in a guillotine stack |
| Booklet pages | 3 mm on the three cut edges | 5 mm, more near the spine | No bleed is needed on the spine edge |
| Die-cut stickers | 2 to 3 mm past the cut contour | 2 to 3 mm inside the contour | The plotter follows the contour, the bleed hides small offsets |
| Roll-up banners and large format | Often 10 mm or more | 20 mm or more | Follow the printer's template, the frame hides part of the edge |
How a PDF stores bleed and trim
A PDF page can carry several boxes. The MediaBox is the whole page, the BleedBox is the trim plus bleed, and the TrimBox is the finished size. Print-ready standards such as PDF/X expect a correct TrimBox, and imposition software uses it to place crop marks exactly on the cut. If a file has crop marks drawn on it but no TrimBox, software has to guess where the cut is. When you export from InDesign, Illustrator or Affinity, tick "use document bleed" and the boxes are written for you.
Setting bleed in common design apps
- Adobe InDesign: File > Document Setup > Bleed and Slug, then export with "Use Document Bleed Settings".
- Adobe Illustrator: set bleed in the new document dialog or Document Setup, then in Save as PDF tick "Use Document Bleed Settings".
- Canva: File > View settings > Show print bleed, then download as "PDF Print" with "Crop marks and bleed" ticked.
- Word or PowerPoint: there is no bleed setting. Make the page 6 mm larger than the finished size (3 mm per side) and extend backgrounds to the edge. Such a PDF has no separate trim box, so in Trimto's step & repeat enter Bleed per side −3 mm to cut 3 mm inside the page edge. If you cannot change the page size, open the file as it is and let Trimto fill the bleed with a color or mirror underlay.
Quick checklist before you send the file
- Backgrounds and images run at least 3 mm past every trim edge.
- No text, logo or code sits inside the outer 3 mm of the trim.
- Borders around the edge are thick enough (or far enough in) that a small drift does not make them uneven.
- The PDF page size equals the trim size plus bleed on both sides.
- Crop marks, if you add them, sit outside the bleed so they never print on the product.
Bleed and layout
Bleed takes space on the sheet, so it lowers the count per sheet; the items per sheet calculator shows the effect. In straight-cut layouts Trimto lets you set bleed per side as a positive, zero or negative value, which controls where the cut falls: a negative value cuts inside the design edge, useful when the page itself already includes the bleed. See Step & repeat for what each value does.
For a deeper look at how imposition works overall, read What is imposition?
Sources
- Wikipedia, Bleed (printing): definition and why trimming needs it.
- Wikipedia, PDF/X: print-ready PDF standards and their page box requirements.
- Wikipedia, Crop marks: how marks show the cut outside the bleed.
- Adobe InDesign Help, Print bleed and slug areas: setting bleed in the document and exporting it.