
Prepress checklist: is your PDF print-ready?
Most reprints and rejected files come from the same handful of mistakes. Run through this list before you send a PDF to a printer. Where it says "your printer", the exact limit depends on their equipment, so their spec sheet always wins.
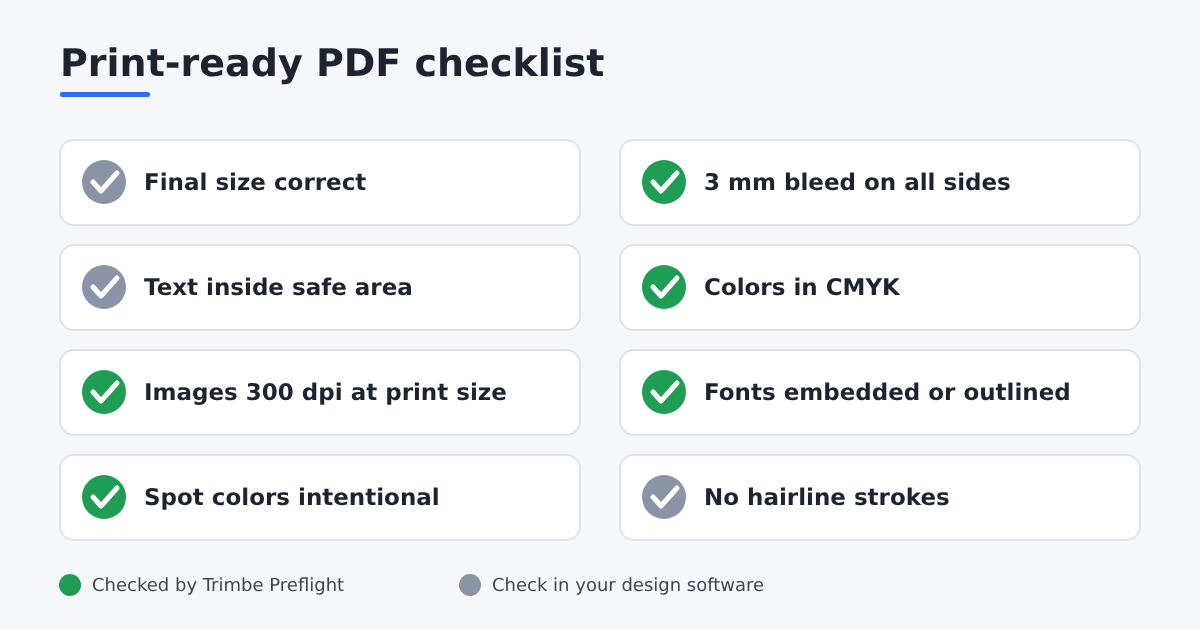
The prepress checklist
- Correct final size. The trim size matches the order, for example 90 × 55 mm, and every page has the same size unless the job needs otherwise.
- Bleed added. Backgrounds and images that touch the edge extend 3 mm (0.125 in) past the trim on every side. See bleed, trim and safe area.
- Safe area respected. Text, logos and QR codes stay at least 3 to 5 mm inside the trim.
- Colors in CMYK. Screens use RGB, presses use CMYK. Converting at the end can dull bright colors, so check the result or deliver CMYK from the start. Pure black text is usually set as 100% K alone, not a mix of all four inks.
- Images at 300 dpi at final size. Resolution is measured at the size the image is printed, not the size of the original file. Large signs viewed from far away often accept less, so ask your printer.
- Fonts embedded or converted to outlines. A PDF that only names a font can swap it on another computer and shift every line.
- Spot colors are intentional. Pantone, foil or a cut line such as CutContour should be there on purpose and named as your printer expects. Anything else should be converted to CMYK.
- No hairlines. Very thin strokes can disappear in print. Keep lines at about 0.25 pt (0.1 mm) or thicker unless your printer says otherwise.
- Single pages in reading order (one page of the document per PDF page, not spreads), unless the printer asks for spreads. Booklet imposition is normally done after this step.
- Delivery format. A PDF is the usual choice. If the printer asks for a standard such as PDF/X, export with it and keep a backup of the editable source.
Checking image resolution yourself
Effective resolution is the number of pixels divided by the printed size in inches (1 inch = 25.4 mm).
Worked example. A logo photo is 1500 pixels wide.
- Placed 90 mm wide on a business card: 90 ÷ 25.4 = 3.54 in, and 1500 ÷ 3.54 = about 423 ppi. Plenty.
- Stretched to 200 mm wide on a flyer: 200 ÷ 25.4 = 7.87 in, and 1500 ÷ 7.87 = about 190 ppi. It will look soft up close.
| What is printed | Viewing distance | Typical minimum |
|---|---|---|
| Cards, labels, flyers, books | Held in the hand | 300 ppi |
| Posters | 1 to 2 m | 150 to 200 ppi |
| Banners and signs | Several metres | 72 to 100 ppi |
Upscaling a small image in software adds pixels but not detail. If an image is too small, find a larger original.
Black: plain or rich
Plain black (0/0/0/100) is right for body text and thin lines, because one ink cannot misregister. Rich black, black with some cyan, magenta or yellow added, looks deeper in large solid areas, which is why designers use it for backgrounds. Do not use rich black for small text, and keep the total of all four inks within your printer's limit, often around 300%. Too much ink dries slowly and can rub off onto the next sheet.
Which PDF standard to export
| Standard | Colours allowed | Transparency | When to use |
|---|---|---|---|
| PDF/X-1a | CMYK and spot only | Flattened | Older workflows and printers that ask for it by name |
| PDF/X-3 | CMYK, spot, and colour-managed RGB or Lab | Flattened | Colour-managed workflows that convert at the RIP |
| PDF/X-4 | CMYK, spot, colour-managed RGB, grey | Kept live | Most modern digital and offset printers |
All three require embedded fonts and a defined trim, so exporting with a PDF/X preset catches several items on the checklist at once. In InDesign and Illustrator choose the preset in the Export or Save as PDF dialog. Canva has no PDF/X option; download "PDF Print" with crop marks and bleed and run it through preflight.
Most common reasons files are rejected
- Bleed is missing, or the page size includes bleed but the content does not extend into it.
- Text is converted to images at low resolution, so it prints fuzzy.
- RGB colours are converted automatically and a bright brand colour turns dull.
- Fonts are missing, so a fallback font changes line breaks.
- The wrong page size, for example A4 delivered for an A5 booklet.
File formats that work best
| Format | Recommended when |
|---|---|
| Best choice: preserves vectors, CMYK, and spot colors. Each page is one design. | |
| SVG | Logos and simple vector shapes. |
| PNG | Images requiring a transparent background (custom-shaped labels). |
| JPG | Photos and solid background artwork. |
Books and catalogs: use multi-page PDFs or individual page images, and open them in Book & Catalog Imposition.
For die-cut stickers and labels:
- Each label should be one page (or one file), sized to fit the label. If there are extra white margins, use trim to content.
- Custom-shaped labels: use vector PDFs or transparent PNGs so the cut line hugs the artwork accurately.
Fixing common problems in customer files
| Symptom | Cause | Fix |
|---|---|---|
| Print looks duller than the screen | RGB file | Ask for CMYK, or accept a slight shift |
| Text prints in another font | Font not embedded | Embed fonts or outline text |
| White edge around labels | Missing bleed | Color fill or mirror at the imposition step |
| Pixelated image | Image under 150 DPI | Upscale AI or print smaller |
What Trimto checks for you
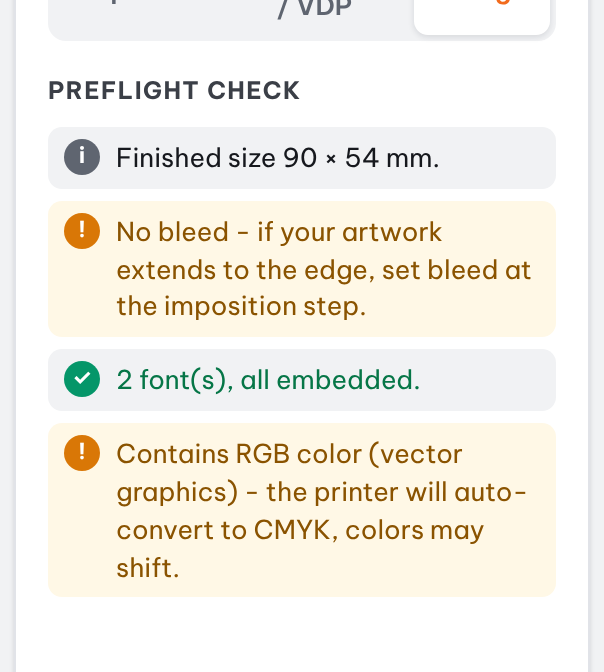
Open a file in Trimto and the Preflight tab checks automatically for: missing bleed, unembedded fonts, RGB colors, images under 300 dpi, spot colors, and invalid QR or barcode content. It also shows the finished size so you can compare it with the order. Fix guidance for each warning is in preflight a print file.
Trimto does not check things like total ink coverage or hairline widths, so look at those in your design software.
Quick order of work
- Fix size, bleed and safe area in the design.
- Convert colors and embed fonts when exporting.
- Open the PDF in Trimto, read the Preflight results, then lay out the sheet with step and repeat or die-cut nesting.
Sources
- Wikipedia, PDF/X: the PDF/X-1a, X-3 and X-4 standards and their requirements.
- Wikipedia, Preflight (printing): what preflight checks before printing.
- Wikipedia, Rich black and Pixel density.
- Adobe Acrobat Help, Preflight profiles (Acrobat Pro): checking a PDF against print profiles in Acrobat Pro.