
Crop marks, registration marks and color bars
Printer's marks are the small lines, targets and color squares printed outside the finished piece, on the waste margin of the press sheet. Crop marks (also called trim marks or cut marks) show where to cut. Registration marks show whether the ink colors line up. Color bars let the press operator check ink density. An info line names the job and the sheet. All of them are cut away after printing, so the customer never sees them. In Trimto you switch them on under Cut settings and Advanced in step and repeat imposition, and they are drawn into the exported PDF.
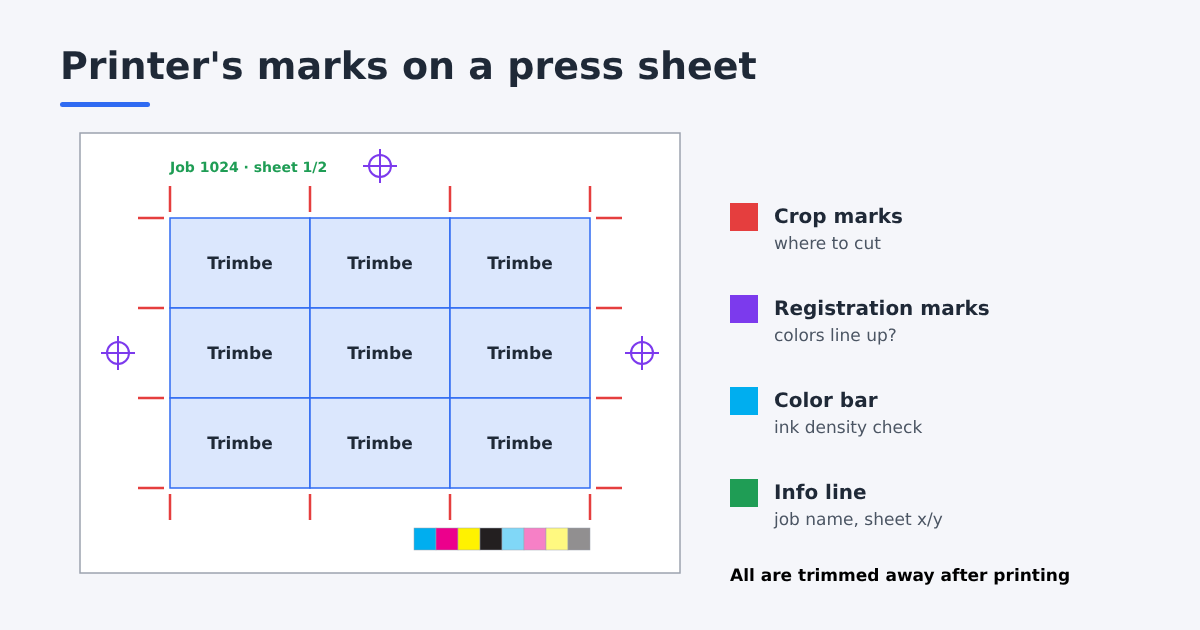
The four marks at a glance
| Mark | What it shows | Who uses it | Typical look |
|---|---|---|---|
| Crop marks | Where each trim line runs | The person at the guillotine or cutter | Thin lines, a few millimetres long, just outside each corner |
| Registration marks | Whether the color plates line up | Press operator | Circle with a crosshair, printed in every ink |
| Color bar | Ink density and color balance | Press operator, quality check | Row of small squares: cyan, magenta, yellow, black and tints |
| Info line | File name, date, sheet number | Everyone handling the stack | One line of small text (about 6 pt) in the margin |
Adobe InDesign lists the same set in its print dialog (crop marks, bleed marks, registration marks, color bars, page information), and so does Acrobat Pro's Add Printer Marks tool. See the sources at the end.
Crop marks
A crop mark is a short line drawn in line with a trim edge but outside the artwork, so that the cutter can see where to cut without a line being printed on the finished piece.
Three details matter:
- Offset. Marks start a little away from the trim, so they never print into the bleed. If your file has 3 mm bleed, the marks must start beyond it, or they will show on the edge of the finished card. InDesign's help says the same: set the mark offset larger than the bleed.
- Thickness. Crop marks are hairlines, usually 0.25 pt, printed in all inks or in black.
- One set per cut, not per item. On a sheet of 21 business cards cut with a double cut, every vertical and horizontal cut gets one mark at each sheet edge. You do not need marks around each card.
Crop marks are for straight cuts. For die cutting and print-and-cut (stickers, shaped labels), the cutter follows a cut path such as a CutContour spot color line instead. Read kiss cut vs die cut for that workflow.
In Trimto: tick Crop marks in Cut settings. Marks are 4 mm long, start 1 mm outside the layout block and are drawn in 100% black at 0.25 pt, at every cut line that reaches the edge of the block. Trimto automatically leaves 5 mm of room between the layout block and the paper edge so the marks always fit.
Registration marks
A full-color job prints cyan, magenta, yellow and black from separate plates or drums. If one color is shifted, edges look blurred or show colored halos. A registration mark is a target printed in every ink at once. When the press is in register, the four colors fall exactly on top of each other and the target looks crisp and black. If one ink is off, you see a colored line beside the target.
Registration marks are placed in the margin, usually centred on each side of the sheet. At least two (on opposite sides) are useful; four is better.
In Trimto: under Advanced, tick Registration marks. Each mark is 5 mm across, printed in the registration color (100% of all four inks), centred on each side of the layout block where the margin has room. If the margin only fits one, Trimto warns you to increase the safe margin.
Color bars
A color bar (also called a control strip) is a row of small solid patches. With a densitometer or by eye, the operator checks that each ink is laid down at the right strength across the sheet. Commercial presses use long strips with many tints. For short-run and digital printing, a short bar is enough to spot a weak or missing color.
In Trimto: under Advanced, tick CMYK color bar. It has eight 4 mm patches: cyan, magenta, yellow and black at 100%, then each at 50%. It sits in the bottom margin, aligned to the right edge of the layout.
Info line
The info line (InDesign calls it page information) is a short text line in the margin with the job name, date and sheet number. It stops sheets from different jobs getting mixed up in the cutting room.
In Trimto: under Advanced, tick Info line and type your own text. When a job has several sheets, Trimto adds "sheet x/y" automatically. If you leave the box empty, it prints the Trimto line shown greyed out in the box.
Where marks go on the sheet
Marks need margin. A simple budget for a sheet with all marks on:
| Space | Typical size |
|---|---|
| Gripper and non-print edge of the press | 3 to 10 mm, see your printer's spec |
| Crop marks (offset + length) | 5 mm |
| Registration marks, color bar, info line | 5 mm |
If the margin is too small, something has to go. Trimto never shrinks your layout or drops copies to fit marks. It places each mark only where there is room, skips the ones that do not fit, and tells you which were skipped.
When you do not need marks
- Printing at home or on an office printer and cutting with a ruler: crop marks help, the rest do not.
- Your printer imposes the job. Most print shops want a single-page PDF with bleed but without marks, because their imposition software adds its own marks. Check the upload rules.
- Die-cut or print-and-cut stickers: the cutter reads registration marks of its own (for example the black squares a vinyl cutter's optical sensor looks for) and a cut path. Those are machine-specific; follow your cutter's software.
How to add crop marks to a PDF
- InDesign: File > Print or Export Adobe PDF > Marks and Bleed, then tick the marks you want.
- Illustrator: Object > Create Trim Marks draws editable marks around a selection; the print dialog's Marks and Bleed adds them at print time.
- CorelDRAW: File > Print, Prepress tab: crop/fold marks, registration marks, color calibration bars and file information. The print page must be larger than the design page for marks to appear.
- Acrobat Pro: Print Production > Add Printer Marks embeds marks into an existing PDF.
- Free, in the browser: drop your PDF into step and repeat imposition, set the sheet size and copies, tick the marks and export. Your files stay on your computer.
For a full pre-press check before sending a file, use the print-ready PDF checklist. For the zones around the trim line, read bleed, trim and safe area.
Sources
- Adobe InDesign Help, Set printer's marks: crop, bleed and registration marks, color bars, page information and mark offset.
- CorelDRAW Help, Printers' marks: marks in the Prepress tab of the Print dialog.
- Adobe Illustrator Help, Create and manage crop marks: Object > Create Trim Marks.
- Wikipedia, Printing registration: how the colors are aligned on press.