
How to impose in InDesign, Illustrator, Acrobat
None of the common design programs is an imposition program, but each can do part of the job. InDesign has Print Booklet for booklets. Illustrator has no imposition command, so you build the sheet by hand with Repeat or copies. Acrobat and the free Reader can print a booklet or several pages per sheet from the print dialog. CorelDRAW has an imposition layout in Print Preview and a Step and Repeat docker. This page shows the steps in each, where they stop, and when a dedicated tool such as Trimto's step and repeat imposition or booklet imposition is faster. If the term is new, start with what is imposition.
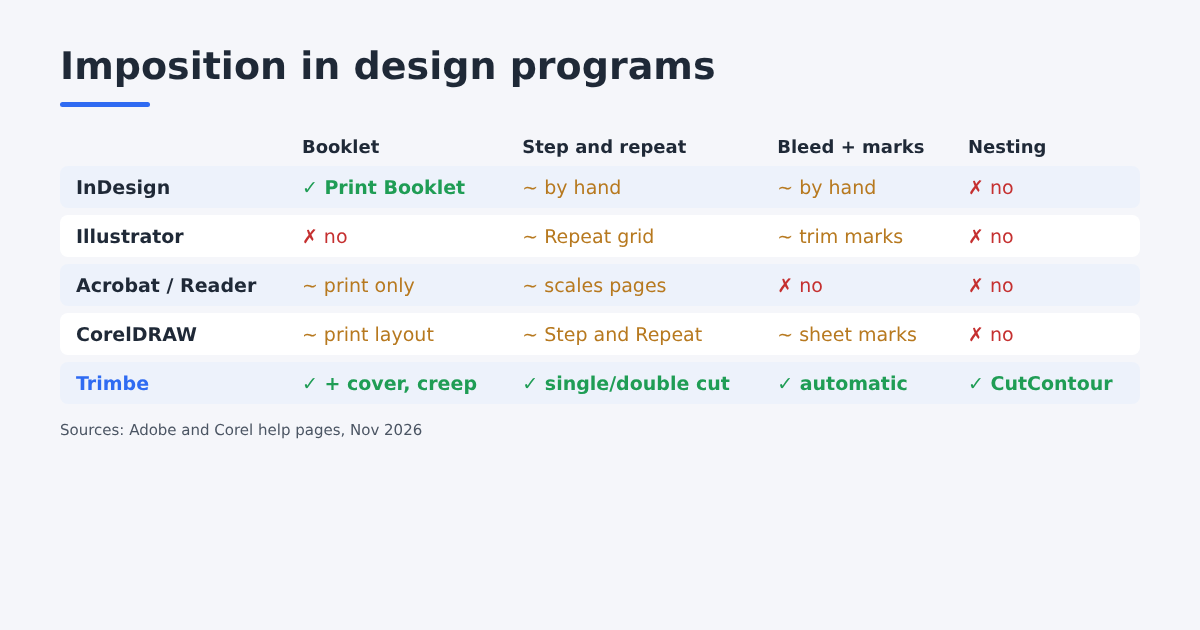
At a glance
| Program | Booklet (saddle stitch) | Step and repeat / n-up | Bleed and crop marks per item | Shaped stickers (nesting) |
|---|---|---|---|---|
| InDesign | Yes: File > Print Booklet, with creep | By hand: Edit > Step and Repeat on a big page | By hand | No |
| Illustrator | No | By hand: Object > Repeat > Grid, or copies | Object > Create Trim Marks | No |
| Acrobat / Reader | Yes, print only: Booklet in the print dialog | Print only: Multiple pages per sheet (scales pages) | No (Acrobat Pro adds marks to the sheet) | No |
| CorelDRAW | Yes, at print time: imposition layout | Imposition layout or Edit > Step and Repeat | Printer's marks for the sheet | No |
| Trimto (browser) | Yes, with creep and cover | Yes: single and double cut, bleed handled | Yes, automatic | Yes, with CutContour |
InDesign: Print Booklet
InDesign is the only one of the four with a booklet tool built in.
- Finish the document with pages in reading order and 3 mm bleed.
- Choose File > Print Booklet.
- Pick a booklet type: 2-up Saddle Stitch (folded and stapled), 2-up Perfect Bound (glued spine) or 2-, 3- or 4-up Consecutive.
- Set bleed (and Space Between Pages for perfect bound) and, for thick booklets, Creep (a negative value pushes inner pages toward the spine; read what is creep).
- Print to a printer, or to PDF through the Adobe PDF printer or a PostScript file.
Limits: the page count must work out in fours for saddle stitch, and Print Booklet only handles one document. For business cards or labels, InDesign has no n-up command. You make a page the size of the press sheet, place the card and use Edit > Step and Repeat to fill it, then draw crop marks yourself. Every change of sheet size means starting again.
Illustrator: build the sheet by hand
Illustrator has no imposition or booklet feature. Common ways to fill a sheet:
- Object > Repeat > Grid makes a live grid of copies you can drag to more rows and columns.
- Move with Copy, then Object > Transform > Transform Again (Ctrl/Cmd + D) repeats a fixed step.
- Object > Create Trim Marks draws editable crop marks around a selected object.
Limits: you work out the spacing, bleed overlap and number of copies yourself. Text and effects are duplicated many times, which makes files heavy. For booklets there is no page-order tool, so you would have to arrange spreads by hand.
Acrobat and Reader: print-time imposition
The print dialog of Acrobat and the free Acrobat Reader has two useful options under Page Sizing & Handling:
- Booklet: reorders pages so a double-sided print can be folded and stapled. Set Binding (left or right) and, on a single-sided printer, print Front side only, flip the stack, then Back side only.
- Multiple: prints 2, 4, 6 or a custom number of pages per sheet (Adobe calls this n-up), in the order you choose.
Limits: both happen at print time. To keep the result as a PDF for a print shop, you have to print to a PDF printer such as Adobe PDF or Microsoft Print to PDF. Multiple scales pages to fit the grid, so a 90 × 55 mm card will not stay at 90 × 55 mm, and there is no bleed, gap or crop mark per item. Acrobat Pro can add printer's marks to a sheet (Print Production > Add Printer Marks), and plug-ins such as Quite Imposing Plus add full imposition.
CorelDRAW: imposition layout and Step and Repeat
CorelDRAW is popular in sign and print shops, and it has two tools:
- Imposition layout in File > Print Preview: choose a preset such as n-up or a booklet, set gutters and page order. The layout changes how the document prints, not the document itself.
- Edit > Step and Repeat opens a docker where you set the number of copies and the horizontal and vertical offset, to fill a sheet with copies in the document.
Printer's marks (crop marks, registration marks, color bars, file information) are set in the Prepress tab of the Print dialog. See crop marks, registration marks and color bars.
Limits: like InDesign, the n-up layout trims nothing for you, so bleed between cards needs care, and a shaped sticker layout still has to be arranged by hand.
When a dedicated imposition tool is faster
Use a design program when the job is a one-off and you already have the file open. Use an imposition tool when you:
- Lay out the same card or label on different sheet sizes (A3, SRA3, 12 × 18 in, 13 × 19 in). Change the sheet and the layout is rebuilt.
- Need a single or double cut with bleed. Gaps, bleed and crop marks are calculated, and the count is never less than you asked for.
- Print shaped stickers. Die-cut sticker nesting traces each outline, nests shapes tightly and exports a CutContour cut line.
- Number tickets or add Excel data. Variable data printing adds numbers or rows to each copy, in cut-and-stack order if needed.
- Make a booklet from any PDF, including the cover and creep, without InDesign. Use booklet imposition.
Trimto runs in the browser, is free, and your files stay on your computer. A typical job: export your design as a single-page PDF with bleed from InDesign, Illustrator or CorelDRAW, drop it into Trimto, choose the sheet and cut, and export the print sheet.
Sources
- Adobe InDesign Help, Impose documents for booklet printing: booklet types, space between pages and creep.
- Adobe Illustrator Help, Create grid repeats and Create and manage crop marks.
- Adobe Acrobat Help, Print booklets and Print multiple pages per sheet.
- CorelDRAW Help, Imposition layouts and Printers' marks.